How To Create Drawing App Using OpenCV and Python (Virtual Pen)
Have you ever wished you could draw on your computer screen without even touching a mouse or a touchscreen? Imagine this — you’re holding a brightly colored object in your hand, and your webcam is smart enough to track it in real-time. As you move your hand through the air, the object becomes your virtual pen, letting you sketch, doodle, or write directly on a digital canvas with smooth, flowing movements
In this article, we will create an Interactive Drawing App using OpenCV and Python. This app works as a virtual pen, allowing you to draw on your screen just by moving an object in front of your webcam.
By the end of this guide, you will have your own working drawing application that you can customise for your needs.
What is an Interactive Drawing App?
An interactive drawing app allows you to create drawings by tracking an object’s movement through your webcam. Instead of using a mouse, touchpad, or stylus, the app detects a colored object and uses its position as the pen tip.
In this project:
- We will track a green-colored object.
- Draw on the screen based on its movement.
- Control drawing functions through keyboard keys.
- Allow colour and thickness customisation in real-time.
Why Build This Project?
Building a virtual pen with OpenCV is a fun way to learn:
- How colour detection works in computer vision.
- How to track moving objects in real-time.
- How to use OpenCV’s drawing functions.
- How to combine computer vision with keyboard controls.
You can also extend this project into:
- A gesture-controlled whiteboard.
- A classroom teaching tool.
- A fun drawing game.
- A creative art project.
Tools and Libraries Required
You need the following:
- Python 3.x (any recent version will work)
- OpenCV for computer vision tasks
- NumPy for numerical operations
- Imutils for simplifying OpenCV functions
- Keyboard module for real-time key detection
To install them, run:
pip install opencv-python numpy imutils keyboard
Features of Our Virtual Pen Drawing App
Our app includes:
- Colour Tracking – Tracks a green-colored object in the camera feed.
- Real-Time Drawing – Draws on a virtual canvas as you move the object.
- Dynamic Colour Change – Adjust the drawing colour with trackbars.
- Thickness Adjustment – Control pen thickness while drawing.
- Start and Stop Drawing – Use keys to toggle pen mode.
- Clear Drawing – Reset the canvas instantly.
- Multiple Windows – See both the live camera feed and your drawn canvas.
How Does It Work?
The app works in the following steps:
- Start the Camera Feed
We use OpenCV to capture video from the webcam. - Convert to HSV Colour Space
HSV (Hue, Saturation, Value) is better for colour detection than RGB. - Create a Colour Mask
We create a mask to detect only the green-colored object. - Find Object Position
We use contours to detect the largest green object and find its centre. - Draw Lines
When the pen mode is active, we draw lines between consecutive object positions. - Control with Keyboard
- Press Space to start drawing.
- Press B to stop drawing.
- Press C to clear the drawing.
- Press Q to quit.
- Show the Output
We display both the live camera view and the drawn canvas.
Full Python Code
Here is the complete code for our interactive drawing app:
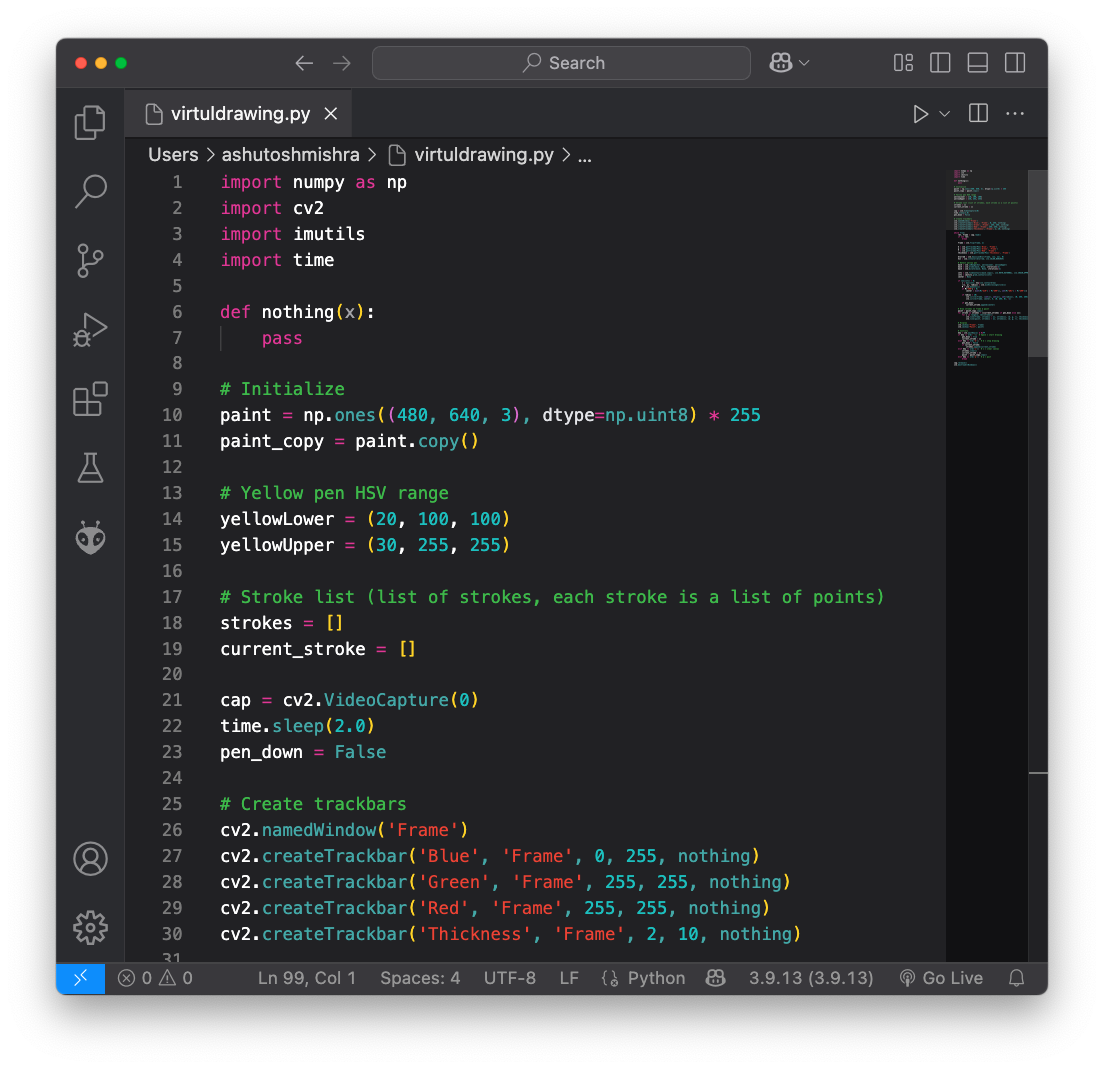
import numpy as np
import cv2
import imutils
import time
import keyboard

def nothing(x):
    pass

once = 0
paint = np.zeros((480, 640, 3)) + 255
paint_copy = paint.copy()
greenLower = (40, 40, 40)
greenUpper = (80, 255, 255)
pts = []
cap = cv2.VideoCapture(1)
time.sleep(2.0)
pen_down = 0
cv2.namedWindow('Frame')
cv2.createTrackbar('mavi', 'Frame', 0, 255, nothing)
cv2.createTrackbar('yesil', 'Frame', 0, 255, nothing)
cv2.createTrackbar('kirmizi', 'Frame', 0, 255, nothing)
cv2.createTrackbar('kalinlik', 'Frame', 2, 10, nothing)

while True:
    _, frame = cap.read()
    frame = cv2.flip(frame, 1)
    b = cv2.getTrackbarPos('mavi', 'Frame')
    g = cv2.getTrackbarPos('yesil', 'Frame')
    r = cv2.getTrackbarPos('kirmizi', 'Frame')
    thickness = cv2.getTrackbarPos('kalinlik', 'Frame')
    blurred = cv2.GaussianBlur(frame, (11, 11), 0)
    hsv = cv2.cvtColor(blurred, cv2.COLOR_BGR2HSV)
    mask = cv2.inRange(hsv, greenLower, greenUpper)
    mask = cv2.erode(mask, None, iterations=2)
    mask = cv2.dilate(mask, None, iterations=2)
    cnts = cv2.findContours(mask.copy(), cv2.RETR_EXTERNAL,
                            cv2.CHAIN_APPROX_SIMPLE)
    cnts = imutils.grab_contours(cnts)
    center = None
    if len(cnts) > 0:
        c = max(cnts, key=cv2.contourArea)
        ((x, y), radius) = cv2.minEnclosingCircle(c)
        M = cv2.moments(c)
        center = (int(M["m10"] / M["m00"]), int(M["m01"] / M["m00"]))
        if radius > 10:
            cv2.circle(frame, (int(x), int(y)), int(radius),
                       (0, 255, 255), 2)
            cv2.circle(frame, center, 5, (0, 255, 0), -1)

        if keyboard.is_pressed('space'):
            pen_down = 1
        if keyboard.is_pressed('b'):
            pen_down = 0
            once = 1
        if pen_down == 1:
            pts.append(center)
        if pen_down == 0 and once == 1:
            pts.pop()
            once = 0
        for i in range(1, len(pts)):
            if pts[i - 1] is None or pts[i] is None:
                continue
            if pen_down == 0:
                pts[i - 1], pts[i] = None, None
            cv2.line(frame, pts[i - 1], pts[i], (0, 255, 0), thickness)
            cv2.line(paint, pts[i - 1], pts[i], (0, 255, 0), thickness)
        if keyboard.is_pressed('c'):
            pts.clear()
            paint = cv2.bitwise_or(paint, paint_copy)
    cv2.imshow("Frame", frame)
    cv2.imshow('Paint', paint)
    if cv2.waitKey(1) & 0xFF == ord('q'):
        break

cv2.destroyAllWindows()
cap.release()
Code Explanation
1. Importing Libraries
We import numpy for array operations, cv2 for computer vision, imutils for image processing, and keyboard for key detection.
2. Setting Up Variables
We define:
- A white canvas (
paint). - HSV range for detecting green objects.
- A list
ptsto store points for drawing.
3. Creating Trackbars
We use cv2.createTrackbar() to adjust pen color and thickness in real time.
4. Capturing Video
We start the webcam using cv2.VideoCapture(1) and flip the frame horizontally.
5. Detecting Colour
We blur the frame, convert it to HSV, and create a mask to detect only the green colour.
6. Finding the Object
We find contours in the mask and select the largest one to detect the pen tip’s position.
7. Drawing on Canvas
If pen_down is active, we store points and draw lines between them on both the live frame and the paint canvas.
8. Keyboard Controls
- Space: Start drawing.
- B: Stop drawing.
- C: Clear the canvas.
- Q: Quit the app.
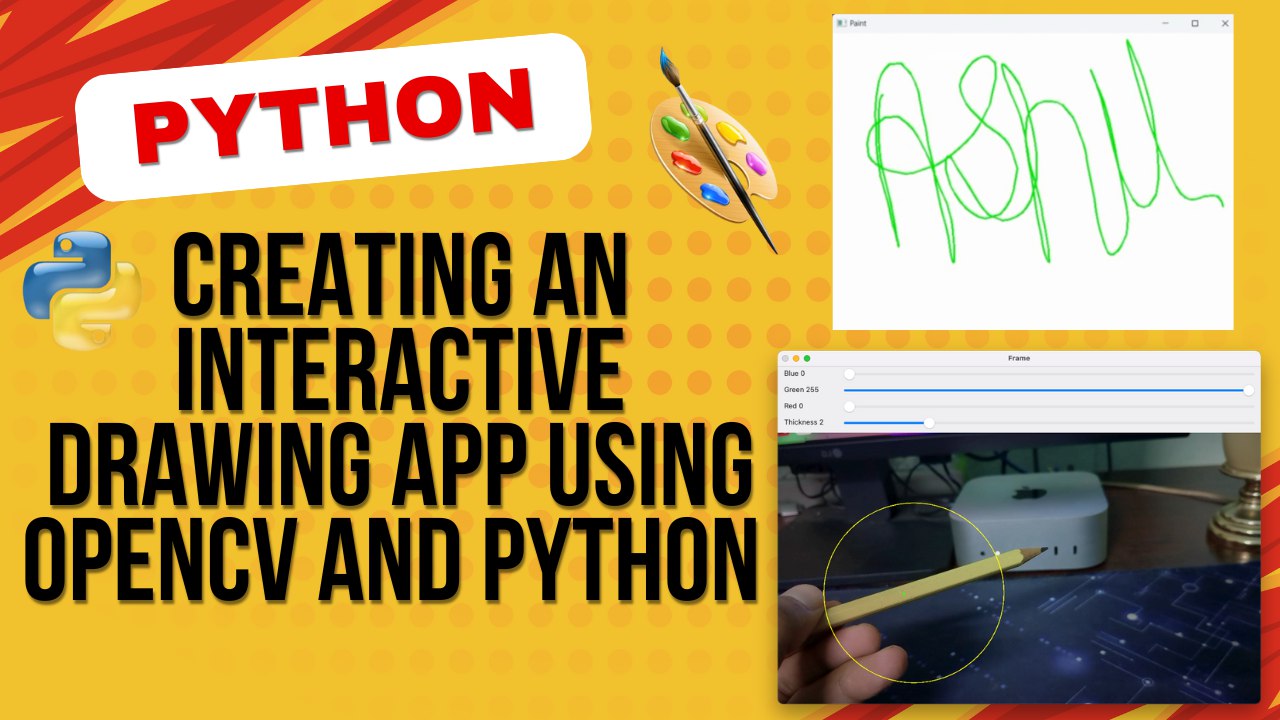
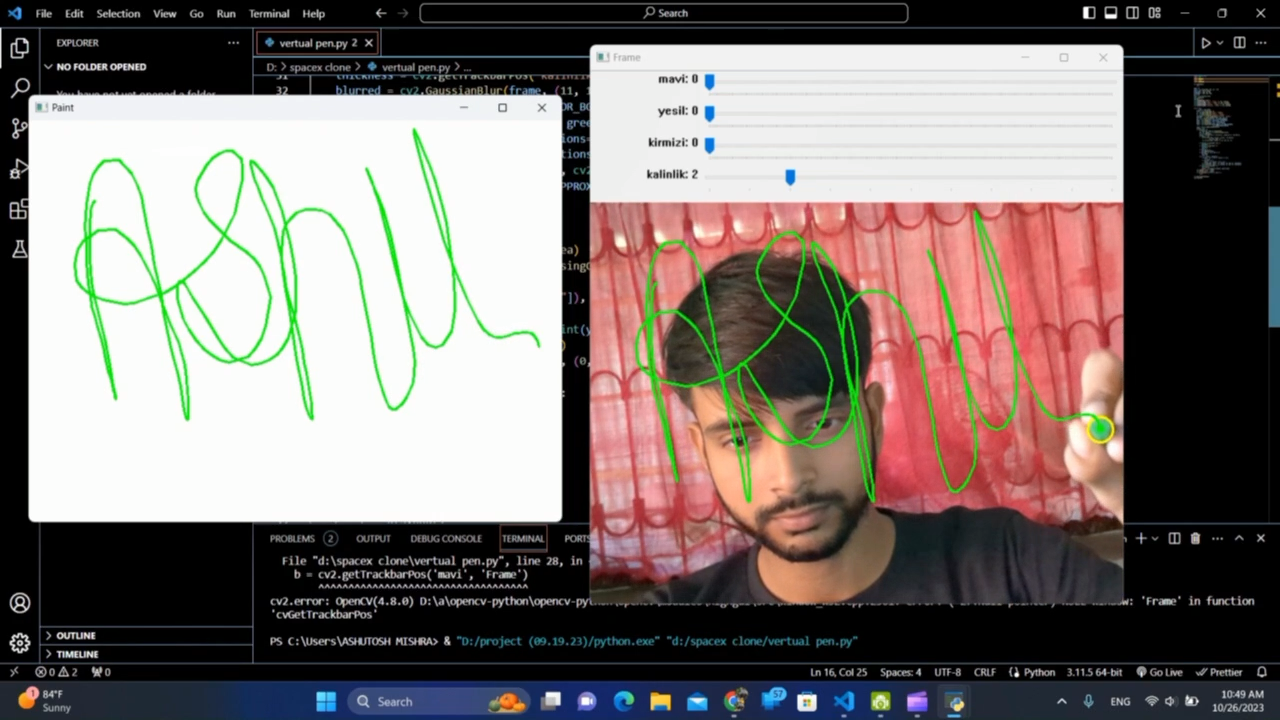
Output Preview
- Frame – Shows the live webcam feed with the detected pen.
- Paint – Shows the drawing created by the pen.
When you move your green object, lines will appear on the canvas following your movement.
How to Run the Project
- Save the code in a file named
virtual_pen.py. - Install the required libraries using pip.
- Place a green object in front of your webcam.
- Run:
python virtual_pen.py
- Use the keyboard controls to draw, stop, and clear.
Output Preview:
Thank you for visiting our Blog codewithrandom. Stay with us for Interesting Projects Like an Interactive Drawing App Using OpenCV and Python
Q1: What programming language is used for this project?
A: The project is built entirely in Python using the OpenCV library for image processing.
Q2: Do I need a special camera for this app?
A: No, you can use any built-in or external webcam that works with your computer.
Q3: Can I change the color of the virtual pen?
A: Yes, you can adjust the HSV color range in the code to detect different colors for the pen.
Q4: Will this app work on mobile phones?
A: This code is designed for desktop environments, but you can adapt it for mobile using frameworks like Kivy or OpenCV for Android.